
NANO BANANNA
The Precision Edit: How to Create Effective Nano Banana Images (Step-by-Step) “Nano Banana” is the unofficial name for a new generation of AI image tools that focuses on editing and controlling visual output with incredible precision. Forget spending hours on masks and layers; this is image editing done through conversation.
This tutorial will guide you through the process, focusing on the prompt engineering techniques that guarantee accurate, professional results every time.
Phase 1: Preparation & Access The most effective “Nano Banana” images start with a clear intent and a quality base image.
Step 1: Access the Nano Banana Model Tool: The core “Nano Banana” functionality (often branded as Gemini Image or Nano Banana Pro/2) is integrated into several platforms, including Google Gemini itself, Google AI Studio, and popular third-party tools like Pixlr or EaseMate AI.
Action: Log into your preferred platform and navigate to the image editing or generation section.
Step 2: Prepare Your Base Image (For Editing) Goal: Start with the highest quality image possible.
Tip: If you are editing an existing photo (e.g., a product shot, a portrait), ensure the base image is high-resolution and well-lit. The AI works best when it has crisp details to manipulate.
Action: Upload the image you intend to modify. For pure generation (creating from scratch), simply start with a blank canvas.
Step 3: Define the Creative Goal Vague: “Make this look better.”
Effective: “Change the background to a soft-focus forest, and give the person a red leather jacket.”
Action: Have a clear, single objective for the first edit. Trying to do too much in one prompt often leads to muddled results.
Phase 2: Conversational Prompting Mastery The secret to Nano Banana’s effectiveness is its ability to understand natural language—not just keywords. You’re talking to a creative director, not a search engine.
Step 4: Write Specific, Descriptive Prompts The model excels when you act like a cinematographer or art director.
Step 5: Leverage Multi-Turn Editing (The “Edit, Don’t Re-Roll” Rule) Nano Banana is designed for conversation. If your first result is 80% correct, don’t start over!
Turn 1: “Change the subject’s outfit to a flowing blue trench coat, cinematic lighting.”
Turn 2 (Refinement): “Keep the trench coat, but now make the lighting moody and neon-soaked, like a cyberpunk alley.”
Turn 3 (Final Tweak): “Make the text on the sign read ‘WELCOME HOME’ in a crisp, white sans-serif font.”
💡 Pro Tip: Identity Locking If you are editing a person or character and want them to appear in a sequence of different images, explicitly request: “Maintain the person’s facial features and identity exactly as they are in the original image.”
Phase 3: Advanced Control and Consistency For professional assets like product marketing or infographics, consistency is paramount.
Step 6: Use Reference Images for Brand Consistency (Nano Banana Pro) If you have access to the Pro version, you can upload multiple images to define a look.
Goal: Create a new product image that matches your brand’s existing look.
Action: Upload your logo, your color palette image, and two of your best-performing product shots as reference images.
Prompt: “Generate a new top-down knolling layout for the three featured products. Use the colors from Reference Image 2 and the consistent soft studio lighting from Reference Image 3.”
Step 7: Demand Text Accuracy and Structure One of the model’s strengths is accurate text rendering and structured visuals.
Infographics/Diagrams: Prompt the entire structure: “Create a clean, 16:9 infographic titled ‘5 Steps to Design.’ Include five labeled boxes connected by arrows. Use a blue and white theme. Ensure the text inside is crisp and readable.”
Mockups: Specify the placement and appearance: “Apply the logo from Reference Image 1 to the front of this t-shirt, ensuring the texture drapes naturally with the fabric.”
Step 8: Final Review and High-Resolution Export Review: Zoom in. Does the added element (like a new background or object) match the shadows and lighting of the original image? If not, use a simple prompt: “Increase the shadow under the object so it matches the background’s light source.”
Export: Request the highest quality supported: “Export this image at 4K resolution with minimal compression.”
By approaching “Nano Banana” as a conversation with a highly skilled, precise editor, you can create professional and impactful visuals with unmatched speed and consistency!
Create variations of a person One of the main reasons Nano Banana has become so popular is its ability to generate image variations while maintaining consistency in elements that you wish to keep unchanged.
For example, I asked it to transform the woman in the photograph located in the upper left corner into a motorcyclist, a famous actress, and a scientist; and it has accomplished this while preserving her face and main features quite faithfully.
I used the following prompts:
Reimagine this woman as a motorcyclist Reimagine this woman as a famous actress on a glamorous red carpet Reimagine this woman as a laboratory scientist
Remove elements from an image Using Nano Banana in Gemini is also highly practical for eliminating objects or subjects without affecting the rest of the image.

I used this prompt:
Remove the chair that appears on the left side of the image.
Integrate one image into another
Integrate one image into another Another interesting feature offered by Nano Banana is the ability to integrate one image within another.

Change the Style of the Image
Finally, we must highlight the capabilities of this tool to apply new artistic styles to your images.

I used the following prompts:
Change the artistic style of the image to a mosaic made with tiles
Apply a muppet style to this image
Change the style of this image to become an abstract painting
Change the style of this image to make it an anime drawing
As you can see, Nano Banana offers countless creative possibilities. Have you tried it yet?
How to Start a Computer Vision Project: A Step-by-Step Guide.

What is a Computer Vision Project?
A computer vision project involves developing systems that enable computers to interpret and understand visual information from the world, such as images or videos. These projects apply machine learning and deep learning techniques to automate tasks like object detection, image classification, segmentation, and more. The goal is to create models that can analyze visual data and make decisions or predictions based on it, which can be applied across industries from manufacturing to healthcare.
Types of Computer Vision Project
The field of computer vision encompasses a wide variety of project types, each defined by its specific goals, applications, and complexity. Some of the most common and fundamental types include:
Image Classification: Sorting visual content into predetermined categories based on their characteristics.
Object Detection: Recognizing and pinpointing specific items within visual content, including their precise locations.
Image Segmentation: Breaking down visual content into distinct regions for comprehensive pixel-level analysis.
Facial Recognition: Authenticating or identifying people through distinctive facial characteristics and patterns.
Pose Estimation: Analyzing and tracking human skeletal structure and body movement patterns.
Anomaly Detection: Identifying defects or irregular patterns within visual data.
Each type requires different datasets, models, and deployment strategies tailored to the specific problem.

Steps to Start a Computer Vision Project.
Step 1: Define the Problem and Plan the Project,
Begin by establishing a comprehensive understanding of the challenge you aim to address. This includes setting specific business goals, identifying stakeholders, and outlining the project scope. A detailed project description should cover:
Project name and purpose.
Business goals and success criteria.
Timeline with milestones.
Stakeholders including privacy and security considerations.
Hardware and infrastructure requirements (cameras, servers, connectivity).
Environment and deployment locations.
Using tools like Gantt charts to assign responsibilities and track progress can enhance project planning and ensure alignment across teams.
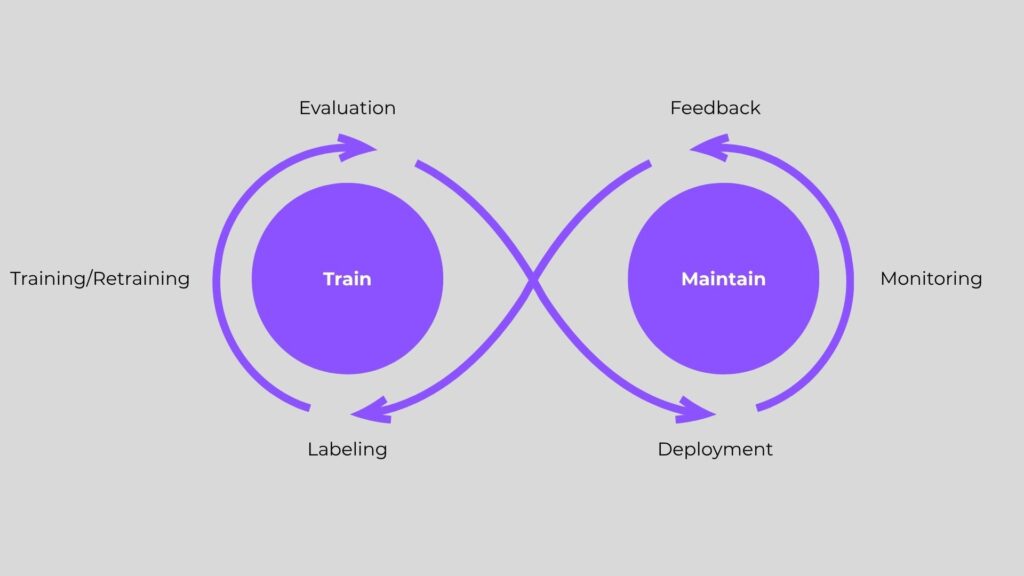
Step 2: Collect and Prepare Data for Your Project
Data collection is critical. Build a comprehensive and well-balanced dataset that accurately represents your specific use case. This involves:
Dataset collection from various sources or capturing new images/videos.
Data annotation to label the visual data accurately, which is essential for supervised learning.
Data preprocessing such as resizing, normalization, and augmentation to improve model robustness.
Properly labeled and meticulously curated datasets form the cornerstone of effective model training and successful deployment.
Step 3: Choose the Right Model and Framework
Choose a model architecture and framework that best suits your project objectives and deployment environment. Key considerations include whether to build a model from the ground up or leverage transfer learning with pre-trained networks, the model’s complexity in relation to hardware limitations (especially for edge deployments), and how well it integrates with your platform while meeting performance requirements.
Leading options include TensorFlow, PyTorch, and niche solutions like Ultralytics for object detection. This decision will influence both your data preparation approach and training methodology.
Step 4: Train Your Machine Learning Model
After finalizing your dataset and choosing a suitable model architecture, initiate the training phase by following these key steps:
Divide your dataset into clear training, validation, and test sets.
Apply suitable training algorithms and fine-tune hyperparameters to boost model performance.
Incorporate data augmentation methods to improve generalization.
Continuously track training metrics to prevent issues like overfitting or underfitting.
Remember, training is an iterative process that often requires several rounds of refinement to achieve optimal results.
Step 5: Evaluate Model Performance
Assess your model using metrics relevant to your task, such as accuracy, precision, recall, F1-score, or mean average precision (mAP) for detection tasks. Evaluation should include:
Testing on unseen data to measure generalization.
Comparing different models or training approaches.
Validating performance under real-world conditions.
This step ensures your model meets the defined business goals and technical requirements.
Step 6: Deploy and Integrate Your Model
Deployment involves integrating the trained model into the target environment, which could be cloud-based servers, edge devices, or embedded systems. Key considerations include:
Model optimization for inference speed and resource constraints.
Setting up APIs or interfaces for application integration.
Ensuring security and privacy compliance.
Preparing for scalability and maintenance.
Deployment transforms your model from a prototype into a usable product or service.
Step 7: Monitor, Iterate, and Improve
After deployment, it’s essential to regularly monitor model performance to identify any drift or errors. Continuously collect new data to update and retrain the model, ensuring it adapts and improves over time. This ongoing lifecycle strategy helps preserve accuracy and maintain relevance in evolving environments.
Challenges When Starting a Computer Vision Project.
When launching computer vision projects, organizations often encounter challenges that can hinder progress—impacting budgets, timelines, and the overall strategic direction. Common obstacles faced across most initiatives include:
Not Enough Data
Insufficient data can lead to poor model performance. Ensure you collect enough diverse and representative samples to train a robust model.
Forgetting About Data Quality
Accurate annotations and high-quality data are just as important as having a large dataset. Inaccurate or low-quality data can misguide the training process and negatively impact model performance.
Choosing a Problem That’s Too Complex
Start with a manageable scope. Overly complex problems can stall progress and exhaust resources. Build feasibility studies or proofs of concept before scaling.
Conclusion
Starting a computer vision project requires meticulous planning, from problem definition and dataset collection to model selection, training, and deployment. By following a structured approach and avoiding common pitfalls, businesses can harness computer vision to automate processes, gain insights, and innovate effectively. Leveraging the right toolkits, frameworks, and hardware, while considering ethical and privacy concerns, ensures your project delivers real-world value and positions your organization at the forefront of AI-driven technology.
Leave a Reply